This site has limited support for your browser. We recommend switching to Edge, Chrome, Safari, or Firefox.

Home of the ORIGINAL Memory Bear & Oprah's Favorite Thing .

Our Favorite Free Face Mask Patterns

Our Favorite Free Face Mask Patterns

Need a mask? Many states have required the use of face masks when out in public spaces so we put together all the info we have in one convenient post!

There are different kinds of face masks and by now everyone knows what an N95 or surgical mask is. Due to the lack of availability, these are for healthcare workers only. 

For personal use, you can buy a mask from us HERE (we donate a mask for every mask purchased) or there are plenty of free mask ideas and patterns available. We complied a list below of our favorites depending on your motivation and skill level. 

First, here are the CDC guidelines about the use of masks/face coverings:

How to Wear a Cloth Face Covering

Side view of an individual wearing a cloth face covering, which conceals their mouth and nose areas and has a string looped behind the visible ear to hold the covering in place. The top of the covering is positioned just below the eyes and the bottom extends down to cover the chin. The visible side of the covering extends to cover approximately half of the individual’s cheek.

Cloth face coverings should—

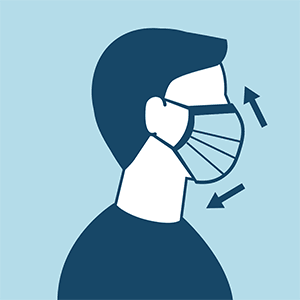
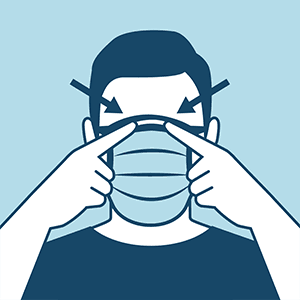
  • fit snugly but comfortably against the side of the face
  • be secured with ties or ear loops
  • include multiple layers of fabric
  • allow for breathing without restriction
  • be able to be laundered and machine dried without damage or change to shape

CDC on Homemade Cloth Face Coverings

CDC recommends wearing cloth face coverings in public settings where other social distancing measures are difficult to maintain (e.g., grocery stores and pharmacies), especially in areas of significant community-based transmission.

CDC also advises the use of simple cloth face coverings to slow the spread of the virus and help people who may have the virus and do not know it from transmitting it to others.  Cloth face coverings fashioned from household items or made at home from common materials at low cost can be used as an additional, voluntary public health measure.

Cloth face coverings should not be placed on young children under age 2, anyone who has trouble breathing, or is unconscious, incapacitated or otherwise unable to remove the mask without assistance.

The cloth face coverings recommended are not surgical masks or N-95 respirators.  Those are critical supplies that must continue to be reserved for healthcare workers and other medical first responders, as recommended by current CDC guidance.

Frontal view of an individual wearing a cloth face covering. Individual is using two fingers to point to either side of the top of the nose, indicating that the covering fits well in this area.

Should cloth face coverings be washed or otherwise cleaned regularly? How regularly?

Yes. They should be routinely washed depending on the frequency of use.

How does one safely sterilize/clean a cloth face covering?

A washing machine should suffice in properly washing a face covering.

How does one safely remove a used cloth face covering?

Individuals should be careful not to touch their eyes, nose, and mouth when removing their face covering and wash hands immediately after removing


BEST FACE MASK PATTERNS AVAILABLE ONLINE

Here are a few of our favorite patterns found online:

Fu Face Mask (from freesewing.org)

Fu Face Mask pattern made by The Patchwork Bear

This pattern is the one I have been using because of the fit that contours to your face. The instructions are straightforward but you will need a sewing machine and basic sewing skills.

For hospital donations, I use size MEDIUM and bias tape for the straps.

For personal use, I use size MEDIUM and 6-1/2 inch elastic.

 Here is a link to the pattern, instructions and video: FU FACE MASK


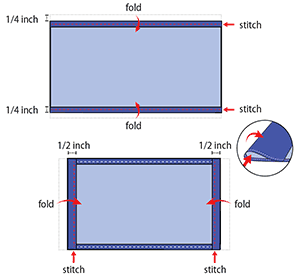
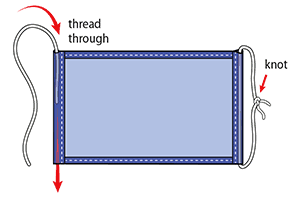
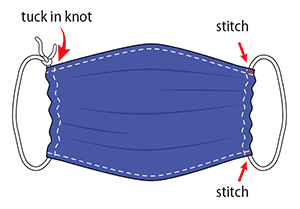
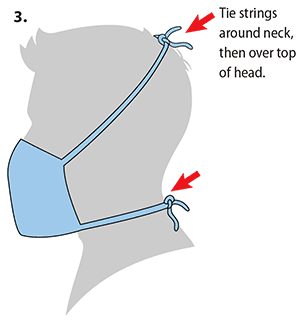
SIMPLE SEWN MASK (from CDC website)

A close up of the two rectangular pieces of cloth needed to make a cloth face covering is shown. These pieces of cloth have been cut using a pair of scissors. Each piece of cloth measures ten inches in width and six inches in length.
 
1. Cut out two 10-by-6-inch rectangles of cotton fabric. Use tightly woven cotton, such as quilting fabric or cotton sheets. T-shirt fabric will work in a pinch. Stack the two rectangles; you will sew the mask as if it was a single piece of fabric.
The top diagram shows the two rectangle cloth pieces stacked on top of each other, aligning on all sides. The rectangle, lying flat, is positioned so that the two ten inch sides are the top and the bottom of the rectangle, while the two six inch sides are the left and right side of the rectangle. The top diagram shows the two long edges of the cloth rectangle are folded over and stitched into place to create a one-fourth inch hem along the entire width of the top and bottom of the rectangle. The bottom diagram shows the two short edges of the cloth rectangle are folded over and stitched into place to create a one-half inch hem along the entire length of the right and left sides of the face covering.
2. Fold over the long sides ¼ inch and hem. Then fold the double layer of fabric over ½ inch along the short sides and stitch down.
Two six inch pieces of elastic or string are threaded through the open one-half inch hems created on the left and right side of the rectangle. Then, the two ends of the elastic or string are tied together into a knot.
3. Run a 6-inch length of 1/8-inch wide elastic through the wider hem on each side of the mask. These will be the ear loops. Use a large needle or a bobby pin to thread it through. Tie the ends tight.
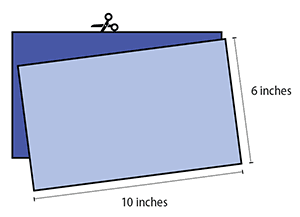
Don’t have elastic? Use hair ties or elastic head bands. If you only have string, you can make the ties longer and tie the mask behind your head.
The diagram displays a completed face covering, in which the knots of the elastic strings are tucked inside the left and right hems of the mask and are no longer visible. The cloth is slightly gathered on its left and right sides, and additional stitching is added to the four corners of the gathered cloth rectangle, at the points where the cloth and the elastic or string overlap in these corners.
4. Gently pull on the elastic so that the knots are tucked inside the hem. Gather the sides of the mask on the elastic and adjust so the mask fits your face. Then securely stitch the elastic in place to keep it from slipping.


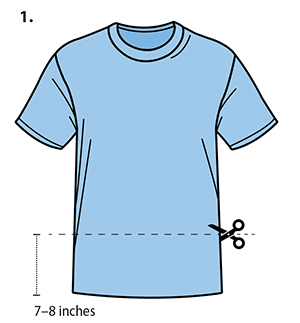
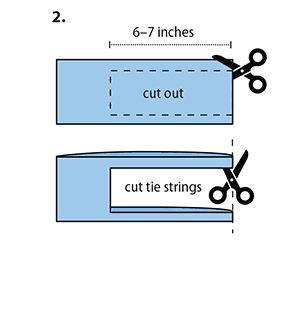
NO SEW FACE COVERING (from CDC Website)

This no-sew t-shirt face covering is simple and easy and found on the CDC website

A front view of a T-shirt is shown. A straight, horizontal line is cut across the entire width of the T-shirt, parallel to the T-shirt’s waistline. Using a pair of scissors, the cut is made approximately seven to eight inches above the waistline. Both the front and back layer of the T-shirt are cut simultaneously.
The rectangle piece of cloth that has been cut from the bottom portion of the T-shirt is shown, lying flat. The rectangle is positioned so that the cut that was just made across the entire width of the shirt is the top side of the rectangle while the original waistline of the T-shirt is the bottom side of the rectangle. From the top right-hand corner of the rectangle, the scissors are moved down approximately one-half inch, along the right, hemmed side of the rectangle. From this point, a six to seven-inch, horizontal cut is made through both the front and back side of the cloth, parallel to the top of the rectangle. The scissors then turn ninety-degrees to cut downward, a vertical line that is parallel to the left side of the rectangle; this cut continues downward until it reaches approximately one-half inch above the bottom of the rectangle. The scissors then turn ninety-degrees again to create another six to seven-inch, horizontal cut that runs parallel to the bottom of the rectangle, back towards the right, hemmed side of the shirt, and cuts through the right, hemmed side of the rectangle. This newly cut out piece of cloth is laid to the side. To cut tie strings, the two remaining slivers of the right side of the rectangle are cut vertically along the hem.
The final piece of cloth is unfolded and worn by an individual. The middle of the cloth piece is positioned to cover the nose and mouth area. The four thin pieces of cloth act as tie strings to hold the cloth face covering in place. The strings around neck, then over top of head are tied into knots.  


FACE MASK WITH FILTER POCKET

Many people have been looking for masks with a pocket to add a simple filter -paper coffee filters, HEPA vacuum bags, etc. For vacuum bags, \be careful which ones you use. Choose the ones made with polypropylene not fiberglass. Quick tip: reusable grocery bags are made of polypropylene so you can cut them up to use as your filter! Here is a free pattern to make a mask with a filter pocket.


DONATE MASKS

We have been donating masks and just started selling masks to offset the costs to donate and ship them. If you are making extra masks, several organizations have stepped up as information hubs to see where and what is needed in your area. 

DEACONESS Healthcare was one of the first I saw that set up a link by state with the ability to request and donate masks. Visit Deaconess HERE

MASKS NOW COALITION is a facebook page that is coordinating the donation and requests for masks. Visit their page HERE

Be well and safe everyone!

xo-Jen

Leave a comment

Please note, comments must be approved before they are published